Pipelines integration
CI/CD is a crucial tool for ensuring the smooth iteration and consistent delivery of Infrastructure as Code (IaC) to production environments. By adopting CI/CD practices, teams can automate the process of integrating and testing changes made to IaC code, allowing for frequent and reliable updates. With CI/CD, each change to the IaC codebase triggers an automated build process, ensuring that any new additions or modifications are properly incorporated. This enables developers to catch errors and conflicts early, facilitating collaboration and reducing the likelihood of issues surfacing during deployment.
Gruntwork Pipelines is a framework that enables you to use your preferred CI tool to securely run an end-to-end pipeline for infrastructure code (Terraform) and app code (Docker or Packer). Rather than replace your existing CI/CD provider, Gruntwork Pipelines is designed to enhance the security of your existing tool. For more information please see the full pipelines documentation.
In the guide below, we walk through how to configure Gruntwork Pipelines in your CI/CD.
Set up machine user credentials
Get the machine user credentials from AWS
-
Log into the Security account in the AWS Console.
-
Go into IAM and find the ci-machine-user under Users.
-
Go to Security Credentials > Access Keys > Create Access Key.
-
Save these values as the
AWS_ACCESS_KEY_IDand theAWS_SECRET_ACCESS_KEYEnvironment Variables in CircleCI.Env var name Value AWS_ACCESS_KEY_ID The Access Key generated for the machine user in the Security account. AWS_SECRET_ACCESS_KEY The Secret Key generated for the machine user in the Security account. GITHUB_OAUTH_TOKEN Enter the MachineUserGitHubPAT here. You can find this in reference-architecture-form.ymlor in the shared account's Secrets Manager.
Verify: Testing an infrastructure change end to end
You can verify the pipeline by making a change to one of the modules. For example, follow the steps below to extend the number of replicas in the sample app:
- Create a new branch in the
infrastructure-liverepo.git checkout -B add-replica-to-sample-app. - Open the file
dev/us-west-2/dev/services/sample-app-frontendin your editor. - Change the input variable
desired_number_of_tasksto2. - Commit the change.
git commit -a. - Push the branch to GitHub and open a PR.
git push add-replica-to-sample-app - Login to CircleCI. Navigate to your infrastructure-live project.
- Click on the new pipeline job for the branch
add-replica-to-sample-appto see the build log. - Verify the
plan. Make sure that the change corresponds to adding a new replica to the ECS service. - When satisfied with the plan, merge the PR into
main. - Go back to the project and verify that a new build is started on the
mainbranch. - Wait for the
planto finish. The build should hold for approval. - Approve the deployment by clicking
Approve. - Wait for the
applyto finish. - Login to the AWS console and verify the ECS service now has 2 replicas.
(Optional) Configure Slack notifications
Create a Slack App
- Visit your apps on the Slack API website, and click
Create New App. - Name your application (e.g.,
CircleCIorCircleCI-Pipeline). - Then select the Slack workspace in which to install this app.
Set Permissions
On the next page select the "Permissions" area, and add these 3 "scopes".
chat:writechat:write.publicfiles:write
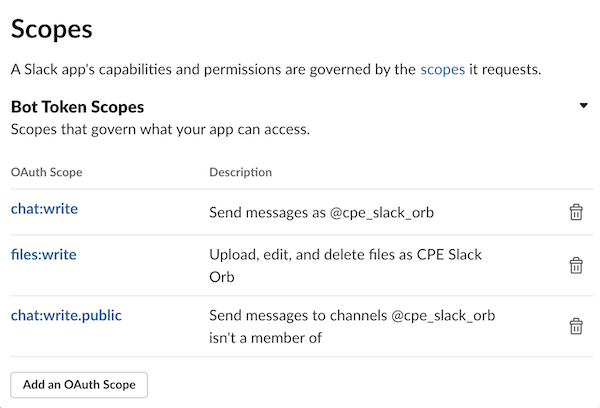 Slack App Scopes
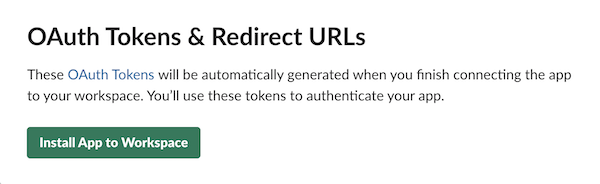
Install and Receive Token
Install the application into the Slack workspace and save your OAuth Access Token. This will be used in a CircleCI environment variable.
 Slack OAuth Tokens
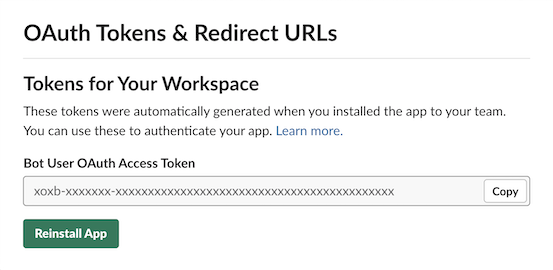 Slack OAuth Access Token
Choose a Slack channel to notify
- Choose or create a Slack channel in your workspace to notify with pipeline updates.
- Right-click the channel name. You'll see a context menu.
- Select
Copy link. - Extract the Channel ID from the URL copied. E.g.,
https://<org>.slack.com/archives/<CHANNEL_ID>
Create env vars on CircleCI
-
Login to CircleCI. Navigate to Project Settings -> Environment Variables.
-
Configure the following environment variables:
Env var name Value SLACK_ACCESS_TOKEN The OAuth token acquired through the previous step. SLACK_DEFAULT_CHANNEL If no channel ID is specified, the app will attempt to post here.